Entitlement Management , Entitlement Processes, Milestone


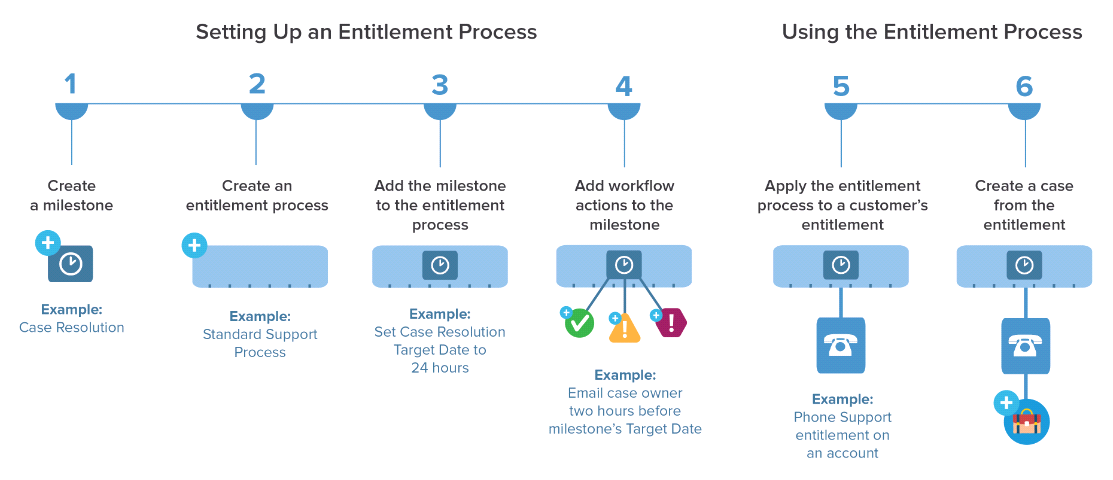
Entitlement processes are timelines provide support for the cases where one can customize as per the requirement like having a timer to be running with respect to business hours (hours can be configured as holidays and working days)for the particular process. these process can help to make update field , send emails, particular action based on actions provided to the milestones added to the entitlement processes. one can add the perform many task based on one Entitlement process by adding multiple milestone to support customer need.

Below are the steps to configure the the Entitlement process and milestone.

1. Go to Setup – > Entitlement Management ->Entitlement Process

Entitlement Process screen

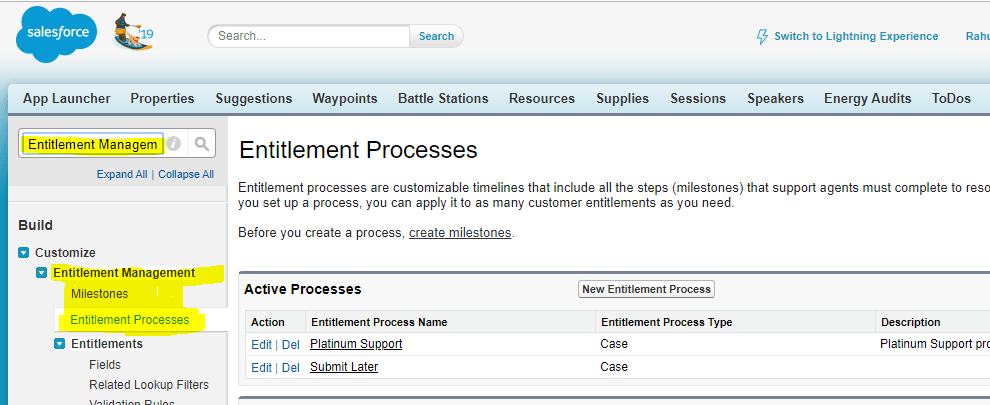
2. Create Entitlement Process
Advanced Options -> add criteria for  case enters and case exits and leave active flag as unchecked because we need to active this entitlement process once milestones are configured as per requirement.

These criteria makes case to be enter / exits out of entitlements

3. Now you can configure your business hour as per your requirement
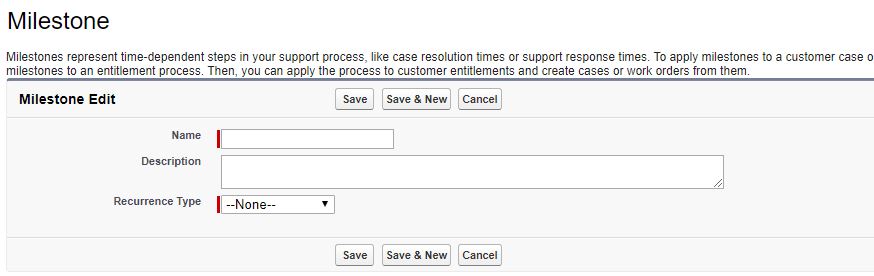
4. Add Milestone to add milestone in the Entitlement Process
Go to Setup – > Entitlement Management -> Milestone
You can add time-dependent workflow actions that occur at every step (milestone) in an entitlement process. For example, you can set up an action to email the case owner one hour before a milestone expires, or to automatically update certain case fields when a First Response milestone is completed.

Milestone can be added into any entitlement process

5.Edit created entitlement process to add milestone just created now.
Add the details to create milestone as per requirement and save the milestone.
once the milestone is added then there are three time based actions can be added

Milestone inside Entitlement process

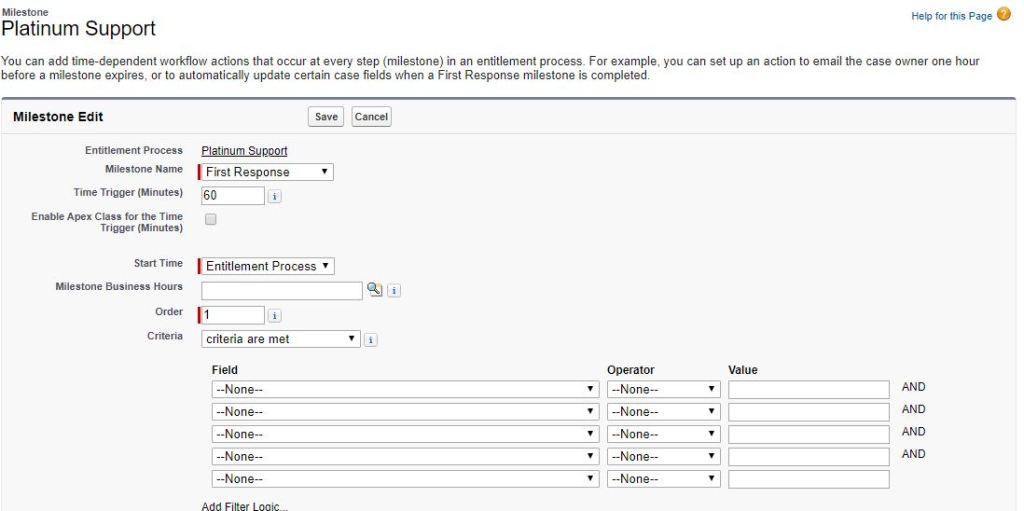
Success Actions, Warning Actions and Violation Actions

Success Actions, Warning Actions, Violation Actions

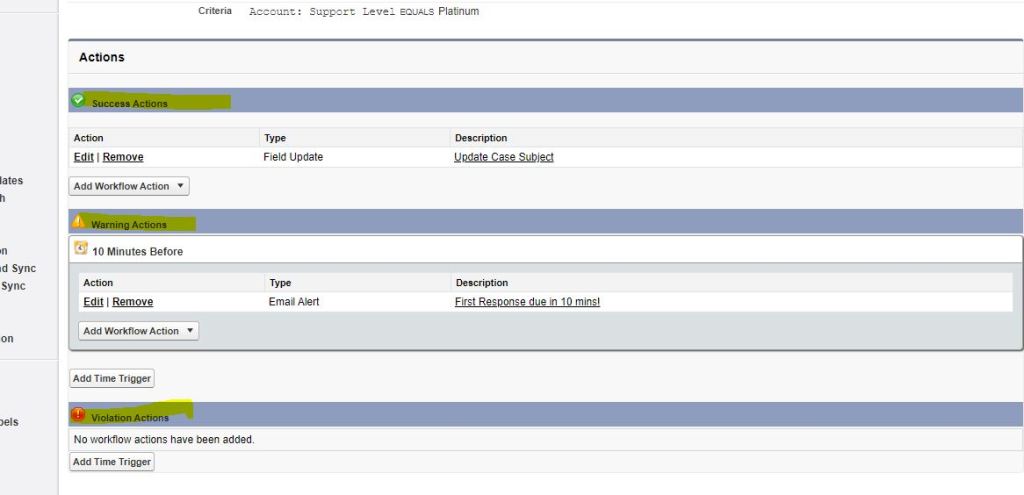
these actions can be added as New Task, New Email Alert, New Field Update, New Outbound Message.
So on success of your requirement you can close your caseMilestone which closes your Entititlement Process and milestone and success action executed.
on Warning Actions on time specified before the complete time elapsed this action gets executed.
Violation action gets executed on the complete time elapsed.
6. after adding Milestone please activate your Entitlement Process.
7.Once the Entitlement Process and Milestone added successfully , Now its time to create an Entitlement with Entitlement tab.

This entitlement record ID to be Associated with Case.EntitlementId

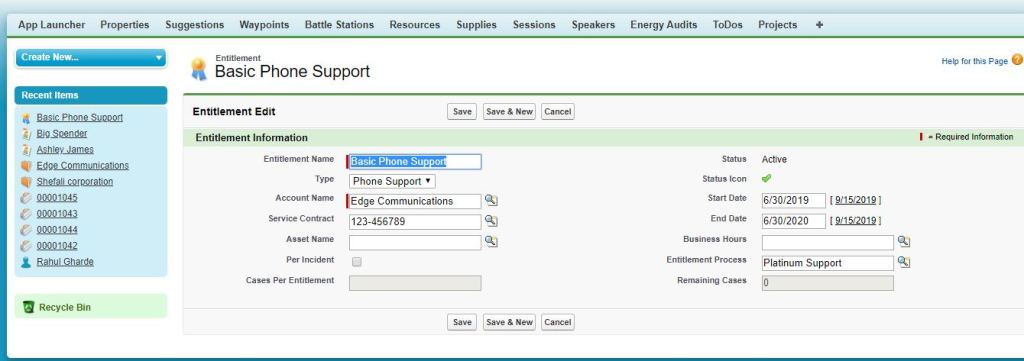
8. This entitlement record ID to be Associated with Case.EntitlementId to trigger entitlement process and time based actions

Please let me know If you find this interesting.

Data types in Salesforce Lightning and JavaScript

Datatypes in Lightning and Javascript

JavaScript data types are “dynamic typed” data types meaning are there are data types but a variables does not bound of them.

There are majorly three data types

  • Number
  • String
  • Boolean

The number data type represents both integer (ex. 123,84 , 950 etc ) and floating point numbers(12.3 , 0.84,9.5).

There are mathematical operations with number are allowed in JavaScript for numbers but there are few points to be considered while using number
1. division by zero is returns infinity
2. multiplication/division between number and number as string will not return the expected result it will return us “NaN

The string data type in JavaScript must be enclosed under quotes. single quote and double quote are simple quote.
1. Backtick(`) quote are important for getting expression under `${1+3}` will return 4
2. Simple quotes “” and ” will return result in string.

for example : 
"This is addition result = 1 + 2" -> "This is addition  result = 1 + 2" 
"This is addition  result = ${1 + 2}" -> "This is addition  result = 1 + 2"  
 'This is addition  result = ${1 + 2}' -> "This is addition  result = 1 + 2"    
` This is addition  result = ${1 + 2} `  -> "This is addition  result = 3" 
let name = 'James Bond';
 ` My Name is ${ name } `  -> "  My Name is James Bond "  

The boolean data type in JavaScript has only values true and false.
let nameFieldChecked = true; // true
let ageFieldChecked = false; // false
let isGreater = 4 > 1; // true

The null datatype does not belong to any of the data type described above.
It forms a separate type of its own which contains only the null value:

The undefined also does not belong to any of the above data type.
If an variable does not assign any value then it is considered as undefined.
If a variable is declared, but not assigned, then its value is undefined.
let x; alert(x); // this will result as undefined

The Object and Symbols
The object type is special.
All other types are called “primitive” because their values can contain only a single thing (be it a string or a number or whatever). In contrast, objects are used to store collections of data and more complex entities. We’ll deal with them later in the chapter Objects after we learn more about primitives.
The symbol type is used to create unique identifiers for objects. We mention it here for completeness, but we’ll study it after objects.

The typeof operator
The typeof operator returns the type of the argument. It’s useful when we want to process values of different types differently or just want to do a quick check.

  1. As an operator: typeof x.
  2. As a function: typeof(x).

JSONGenerator in Apex

This class Contains methods used to serialize objects into JSON content using the standard JSON encoding. There are number of methods available to create a JSON string as per the request we want to generate for API.
The System.JSONGenerator class is provided to enable the generation of standard JSON-encoded content and gives you more control on the structure of the JSON output.

For the following JSON result type.

{
  "type": "Email",
  "templateName": "Basic Template 1",
  "locationID": "346345",
  "from": {
    "name": "Jane Smith",
    "email": "janesmith@gmail.com"
  },
  "to": {
    "name": "John Doe",
    "email": "johndoe@gmail.com",
    "phone": "6501235678"
  },
  "sourceIDs": [
    "FACEBOOK"
  ],
  "variables": [
    {
      "name": "recipient-name",
      "value": "John"
    },
    {
      "name": "recipient-last",
      "value": "Doe"
    }
  ]
}

The following is the code to generate above JSON

JSONGenerator gen = JSON.createGenerator(true);
gen.writeStartObject();            
gen.writeStringField('type','Email');  
gen.writeStringField('templateName','Basic Template');             gen.writeStringField('locationID',346345);
gen.writeFieldName('from');
gen.writeStartObject();
gen.writeStringField('name', 'Jane Smith');
gen.writeStringField('email','janesmith@gmail.com');
gen.writeEndObject();
gen.writeFieldName('to');
gen.writeStartObject();
gen.writeStringField('name', 'John Doe');
gen.writeStringField('email', 'johndoe@gmail.com');
gen.writeStringField('phone', '6501235678');
gen.writeEndObject();
// for single variable
gen.writeFieldName('variables');
gen.writeStartArray();
gen.writeStartObject();
gen.writeStringField('name', 'recipient-name');
gen.writeStringField('value', 'John');
gen.writeEndObject();
gen.writeEndArray();
gen.writeFieldName('sourceIDs');
gen.writeStartArray();
gen.writeString('Salesforce');
gen.writeEndArray();
gen.writeEndObject();

For precise information about the JSON Click on the link .